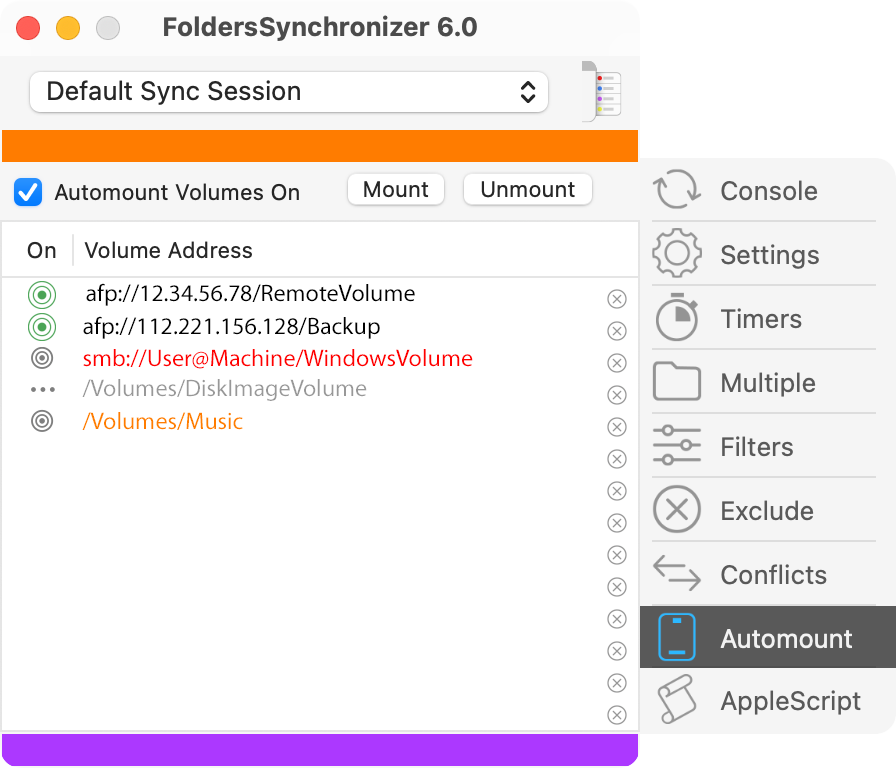
FoldersSynchronizer can automatically mount/unmount remote, local and disk image volumes while executing any sync/backup session. Whenever you define a source or destination folder either on the Console panel or on the Multiple list, FS will add its related volume to the Automount Volumes List in order to re-mount that volume later. Alternatively you can add a volume on the Automount Volumes list by dragging and dropping a volume icon from the Finder onto the list.
Currently FS supports the Automount Volumes feature on apfs, afp, webdav (iDisk) and smb (PC-Windows) remote volumes, local volumes and disk image volumes. In case of remote volumes, mount them using the Finder command "Connect To Server", then drag your source or destination folder from the remote volume on the FS Console. Mounting the remote volume originally using other commands can prevent FS to recognize that volume later.
Go to the Automount Volumes panel choosing the same command from the Options menu in order to activate this feature and edit/add some mount volume informations, like remote share point, username and password.
-
• Automount Volumes On: mark the check-box Automount Volumes On in order to activate and edit the Automount Volumes List.
-
• On: the first column reports the state of each single row. You can switch between On and Off state simply clicking on this cell.
 This icon indicated the row is on and the volume is currently mounted.
 This icon indicated the row is on and the volume is currently unmounted.
 This icon indicated the row is off thus FS will not mount/unmount this volume when executing the sync/backup.
-
• Mount: click on this button to check whether FS can properly mount all the active volumes on the list. If you are going to mount remote volumes, please don't forget to activate the connection to your remote volumes (FTP on, File Sharing on, Remote Machine on, Cable Plugged...).
-
• Unmount: click on this button to check whether FS can properly unmount all the active volumes on the list.
-
• Delete a row: to delete a row, click on the Volume Address holding down the Option key ⌥ or click on the delete icon
 on the right column.
-
• Red Label: from the version 6.2.0 on, FS requires some additional data to automatically mount the volumes, as the UUID for the local disks and the Bookmark data (alias) for the dmg disks. If you open an old FS file saved by a prior version than 6.2, the volumes requiring this update are shown in red on the Automount Volumes list. To update the red volumes with the latest requirements, go to the Automount Volumes panel then manually mount all the volumes on the list, or, launch FS with all of those volumes already mounted, then save your FS file. While displaying the Automount Volumes List, if you rename a volume in the Finder, it will be automatically renamed on the list.
-
• Orange Label: The orange color indicates that volume is encrypted and you didn't yet define a password to make FS mount it automatically. Click on the row and define a password on the Set Volume panel (see here below) such a way FS can automatically mount/unmount it while executing the sync/backup without asking for you to enter the password later. Alternatively, you can define a password on your Keychain.

Define the volume parameters
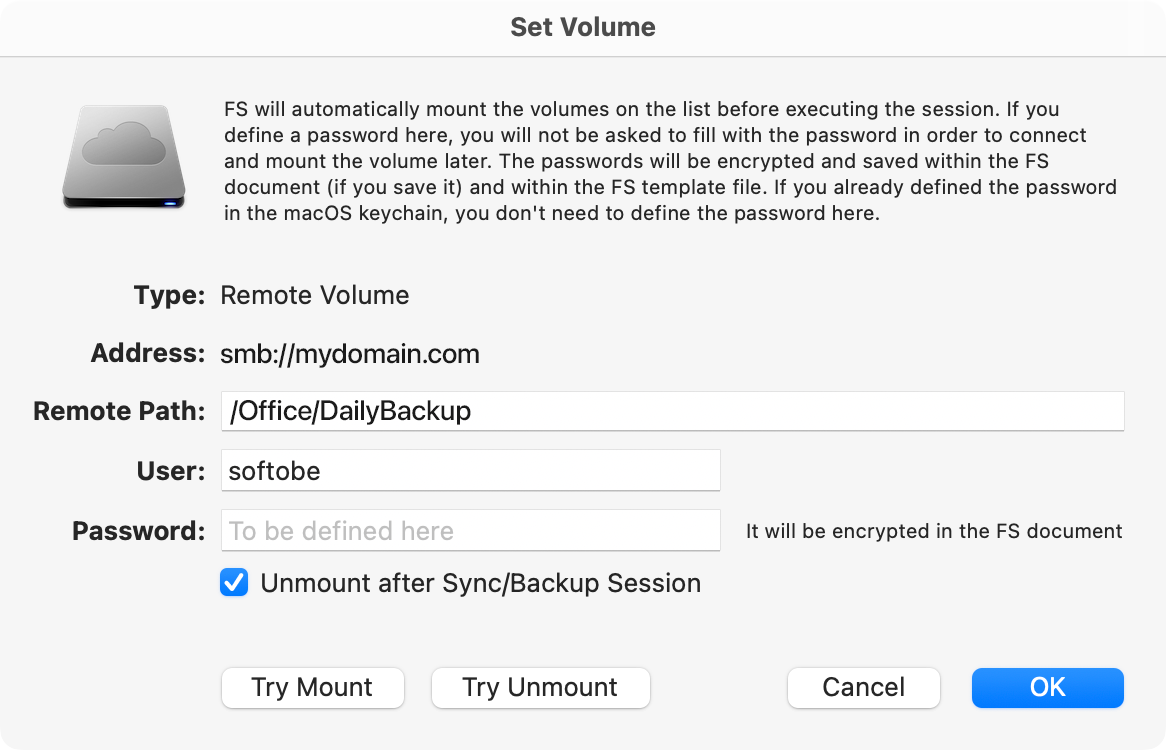
For each row of the list you can click on the non-empty cells and edit the mount volume parameters. You cannot edit an empty row of the list. In order to add a volume to the list, simply go to the Console panel or to the Multiple List panel and define a source or destination folder. FS will update the Volume List automatically. You can edit each single volume information clicking on each non-empty row of the list. You will be shown the Set Volume dialog (see picture below) reporting the following informations.

-
• Type: it's the type of the volume (e.g. Local, Remote or Disk Image).
-
• Address: it's the address of the volume (e.g. smb://mydomain.com).
-
• Remote Path: it's the relative path of the remote volume to sum to the address path and reach your shared folder to mount, e.g. smb://mydomain.com/Office/DailyBackup
-
• User Name: it's the user who mounted the volume. FS will automatically mount the volume later using this account.
-
• Password: in case of volumes requiring a password, if you define the password on this panel, you will not be asked to fill with the password in order to mount/unmount the remote volume later during the sync/backup. This option is useful when the sync/backup has to be launched by a timer, that is, without an operator. If you defined the password, FS will encrypt and store the passwords in the FS document (if saved) and in the template document available at: (Home)/Library/Preferences/com.softobe.FoldersSynchronizer.template.plist, and will set its permissions to rw-------, such a way nobody else but you will be able to open/run/copy/delete that document. The addresses of remote volumes without password will be shown in orange on the Automount Volumes list. For these volumes, at the backup/sync time, you will be asked to fill with the password in order to mount the volume.
If you already defined the volume password to the keychain, you could avoid to define the password in this field. Anyway FS will automatically mount the volume without asking you for the password. -
• Unmount after Sync/Backup Session: if marked, at the end of the sync/backup of the current session, FS will unmount the volume. FS, as default, when adding a new volume to the list, unmarks this check-box for local volumes, and marks it in case of remote and disk image volumes.
-
• Try Mount: click on this button to check whether FS can properly mount this volume.
-
• Try Unmount: click on this button to check whether FS can properly unmount this volume.